Choosing Lens For Your Camera

Lens is important component for every camera. Especially for DSLR users, choosing the right lens is a must. But todo this is a little tricky. There are factors to consider when choosing lens for your DSLR.


Your interest what klind of photos you like to take is the main factor. If you like taking picture of view or landscape, using wide lens is perfect choice. If your hobby is shooting animal, use tele lens or macro lens for capturing tiny object with high resolution.


DSLR especially mid and lowend has something called crop factor since DSLR use tinier sensor than analog SLR does. DSLR uses the same sensor size with analog SLR is still expensive and that's why they called them as high end DSLR. Crop factor influences to lens's focal length. Since the size of crop factor is 1,5, so when you use lens with 18 mm focal length, the camera read it as 28 mm. This doesn't count when the lens attached to the full frame DSLR.


You should consider about diafragma too when picking lens for your camera. When you shoot fast moving object alot, so 2,8 diafragma is good choice. It's different when you taking landscape image, it doesnt have to open diafragma too wide. Note that the more a lens support wide open diafragma, the more price you have to pay, and it goes along with the weigh.


The brand is also factor tobe considered. Generally a combination from the same vendor of camera and lens perform best producing image. And the fact is wellknown brand lens is expensive. This doens't matter for those who has unlimited budget. But when the budget is a serious problem, it's alrite to pick a third party lens.
Just remember, before deciding to choose a lens, always find information about it first, there are plenty of source you could find, such like internet, magazine, friends.
Ok, choose the righ lens for you, attach it to your camera.. then start shooting around!!!

Happy hunting!!


Sunday, 23th of April 2006
Sei Putih, Medan Petisah, Medan
Arief Kamajaya, freelance photographer

Read More...

Picking Angle

For every photographer, observing the view around objects is somehing to do before taking shoots. There are some general common technique to use

Normal View (Eye Level)
This is normal view with heigh as tall as eyes's position. Photografer's position is straigth line with the object to shoot.

Harvesting

Photo with normal view, object's position is straight with eye's position


High View (high level)
Object we shoot below our eye's or camera position

Man's Teapot

Object shot is lower than camera's position, flat area is dominant


Low View (low level)
Object shot above our eye's or camera position

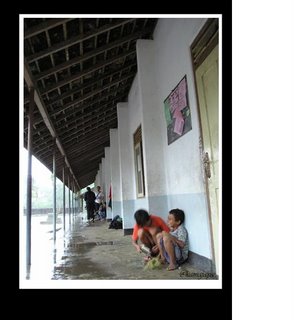
School Corridor
above is photo taken by level view. Roof is dominant


Bird's View (bird eye)
Objeck we shoot is extremely in low position. this technique generaly place camera above our head, sign by object that vanish high

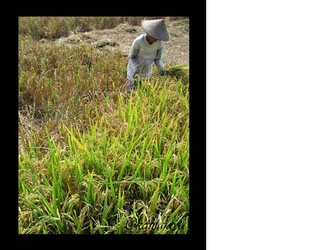
Sickling Grain

Bird eye place object in very low position, with dominan flat area available, and also the sky as high isn't captured


Worm Eye
Taking shoot from ground to make object look exstremely high

Taro of Kaliurang

This photo was taken from the ground. The taro looks so big with extremely tall guy


Those technique have their own characteristic, so that objects we shoot will have a good impression. You could develop these technique doing your own research, just try many angles to shoot.
Good luck and keep practice!!


Medan, 11th of April 2006
@Arief Kamajaya, freelance photographer

Read More...

Biking and Photo Hunting

Biking with photo hunting? Why not? This activity is doable at weekend or holiday. Well, actualy not only biking could be done same time with photo hunting, but other activities too, such like hiking, and even diving!

Yes, beside increasing our health, we would produce many kind of photos for phortofolio. But remember, before we do this, we should observe the field that we re gonna through with the bike. This relates to objects we're gonna hunt and the field condition.

For young people who have great stamina, biking through extrem field would be quait chalenge. But for those who get old with less stamina, they do biking as a light activity, so they would through easy terrain.

So, make your mind, for those biking around the town which usually has flat terrain, so many objects we could shoot, start from market, old buildings, train station, people's activities, and still many more! For those biking around village which usually have tougher terrain, people's activities are interesting objects to shoot

After observing the field we're gonna through, it would be good to plan route. And also check the bike's condition to make sure it's on top conditon, and if ti's not, make it so! parts like brake, tyres, wind pressure, etc. make sure they are in good condition to make the the hunt go well.

And now, preparing the camera. It doesn't matter what camera you use, is it ordinar digicam, DSLR, or even film camera. The important this is the condition of the camera, make sure it's in good condition. Also, pay attention to the bag where you keep the camera, it would be better if we use water resist bag with cushion to protect camera from shock and water. and when it's possible, dont use a huge bag for our confortable when paddling the bike. Dont forget to bring note, for those who like writing, the atmospehere along the trip would be inspiring to write.

Dont forget to bring snack and drink to keep you stay alive :), it's highly recommended carrying many food and water for traveling to remote area like biking to wood, where you will be a little hard to meet setlement. But when you biking around the town, you don't have to bring many of them, just carry some snacks and a tiny bootle of water with money of course, so you could buy them whey run out.

About clothes.. it would be better to wear clothes that prevent our body from getting heat quickly, we could wear bright color clothes to prevent sunlight absorbed by cloth. Remember, bright color absorbs less light then dark color do. And also pay attention to the fabric of cloth we wear, good fabric provide good air circulation, the heat will not traped behind the cloth which affect to our skin.


Here is a personal experience of the writer when biking aroud Bandung city....

It was cold at Caringin (located in Bandung). I planned biking while photo hunting that day. After all preparation were checked, such like top condition of mountain bike, note, snack and water inside a day pack, and of course my SLR camera with 35-70mm lens, I started to paddle. I planned to visit Soreang area.

The area I visited have various people's unique activity.... Began by entering Cigondewah teritory where Sentra Wisata Belanja exist. Here, we could find people's activities in trading. Goods that trade are textile with many kinds and motif. If we good at bargaining, we would have a good quality textile with low price.

After passed Cigondewah, I found a nice moment : farmers harvesting leafy vegetable. I was at Sadang teritory, in Boundary between Kota Bandung and Kabupaten Bandung. Generally farmers here worked not on their own land, but hire land. There were many good moments could be shot by my camera.

I moved on to Mahmud teritory inside Kabupaten Bandung, along the road i observe a raising industrial activity, which is HAT. People here are wellknown as creative people, they made hats using various fabric from waste factory. In their hand, that waste become a useful thing.....

Next route was to Nanjung, where I could see brick industries. We were avle to see brick making provide by locals, started from preparing material, forming, drying, untill roasting.

Plenty photos I'd created, well... not bad to make a photo essay. It was noon already and I had my lunch there, before biking to Gunung Singa Soreang, finish point ot the trip, where we could enjoy view of Bandung city.

Along the way, there were so many photos I made with many kinds of theme. Al least I visited four teritory through one trip with many photos I got, plus I had my body a little more health, hehe

Remember... keep shooting and shooting

Wassalam


Medan, Sunday 9th of April 2006

by : Arief Kamajaya, freelance photographer

Read More...

Digital Camera Printer: Making the Printing Process Easier

Gone are the days of the box-camera – it is the age of digital technology and digital cameras have taken over the entire range of photography. However, at its early stages, digital photography had eclipsed the most exciting aspect of seeing what you have clicked on photographic prints. Things have changed and various digital camera printers with many unique and useful features are now available to take care of this deficiency.

As these digital camera printers do not need a computer to give you the prints, you can print directly from the camera and this makes it very convenient and portable. However, deciding which printer, out of the hundreds flooding the market, would suit you best is the most important question. Given below are the special features and other information relating to these cameras that will help you make the right choice.

In order to get prints at home, digital camera printers have special features ranging from paper sensors that recognize photo media to built-in editing tools. The other special features are given below:

• Memory Card Slots: If you have a memory card slot, all that you have to do is to insert your camera’s memory card and print. You don’t need a computer or any cables.

• Color LCD screen: You can see the photos on a color LCD screen before you print.

• Front-panel buttons: If you want to preview, edit or remove the red eyes, you should choose a printer that has front-panel buttons for this purpose.

• Photo proof sheets: Thumbnail images on a printed page can be displayed on photo proof sheets to enable you to preview and choose the photos you wish to print.

• One-touch connections: You can have one-touch connections to your printer, TV, and PC if you place your camera in a built-in dock for printing directly from your camera. The other advantage is that you can recharge your batteries every time you connect.
Besides considering the above factors you should also consider the following paper-handling factors before you decide which digital camera printer you wish to buy.

• Capacity: It is cumbersome to keep on adding paper to the printer. As such the number of sheets a printer can hold is important. Generally personal printers hold between 100 and 300 sheets.

• Versatility: Choose the printer that can print on the type of paper you wish to use. Some printers cannot print on certain types of papers that other printers can.

• Paper size: Your choice of a printer should be such that it can handle letter (8 1/2" x 11") and legal (8 1/2" x 14") sizes, as well as borderless 4" x 6" and 5" x 7" photo paper, panoramic paper, and envelopes.

• Image Quality: The prices of the printers of color photographs, though high in the beginning, have now come down and are within the reach of the average buyer but you must ensure that the printer can deliver photo realistic results, which should be as close to real photographic prints as possible.

• Print Resolution: For fine details and smooth gradation the print resolution should be about 2,400 x 1,200 dpi and this would be more than sufficient.

These digital camera printers store the images we capture on a memory storage device like a memory stick, a memory card, or even the camera’s built-in memory. There are many people who would also like to have actual copies of their photographs. It is a matter of choice and depending on your needs you can choose the best digital camera printer. The above-mentioned features will help you in making the right choice.

by: Ismael D. Tabije

Read More...

Pentamirror Shop